Aerophone Mini - Some additional fingerings for the recorder player
If you look closely at the official fingering chart of the Aerophone Mini, you will notice that all the suggested fingerings for chromatic notes (flats and sharps) require the use of the left pinky finger. In fact, as you probably already know, the two small keys on the left side raise and lower the current note by one semitone.
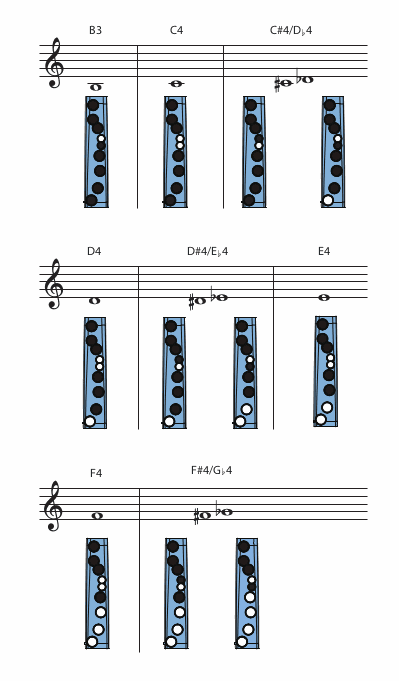
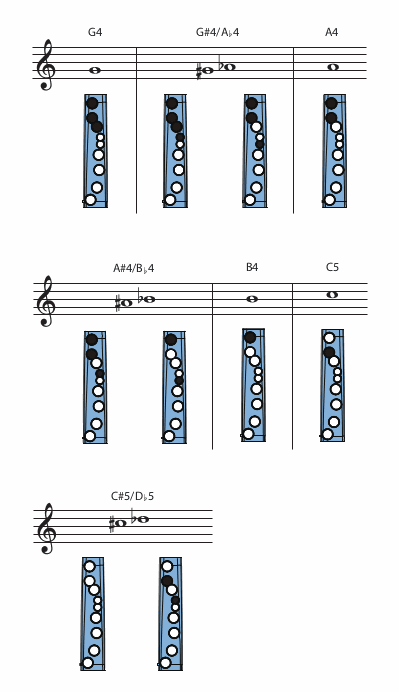
I know it is not just me that find the usage of those little keys more than annoying. As a recorder player, I am used to "forked" fingerings, where you can lower a note by closing one or more holes towards the bottom of the instrument, leaving opened the one immediately below. For example, you can play an F#/Gb with the following fingerings (and without using the little finger):
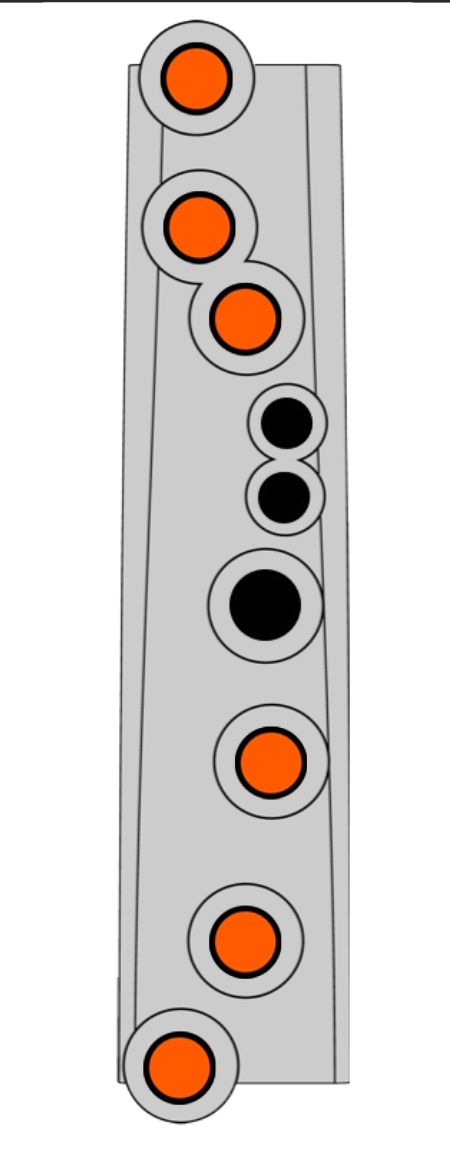
The good news is that many of these forked fingerings are already in place in the Aerophone Mini.
We have just seen the F#/Gb, but we have also the G#/Ab:
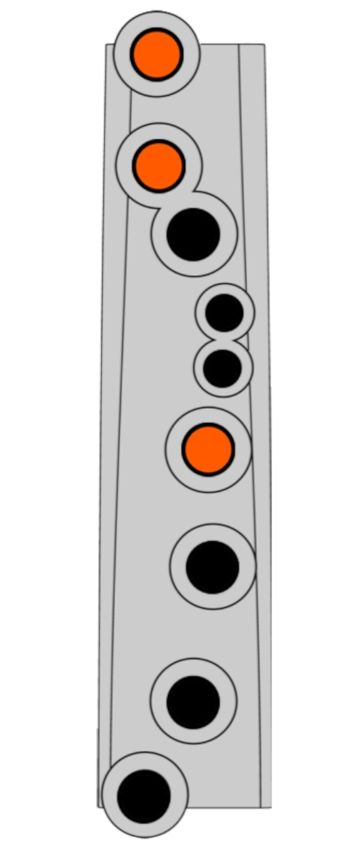
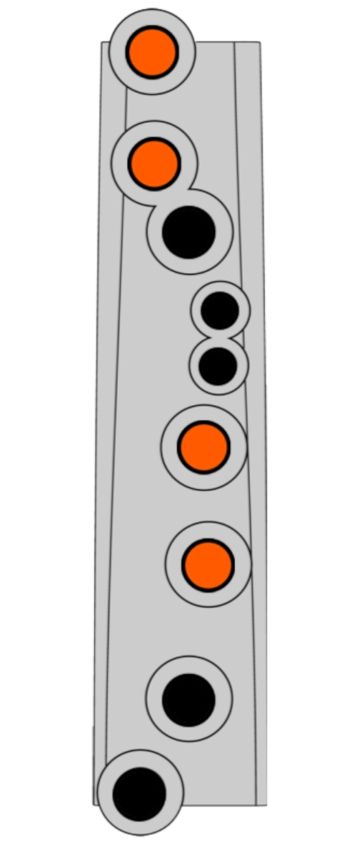
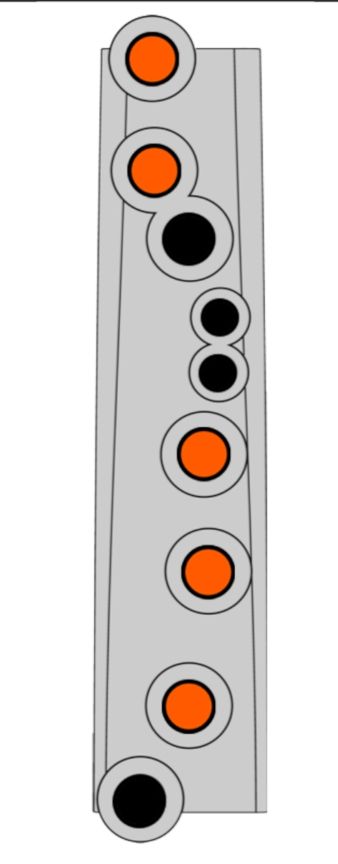
And the A#/Bb:
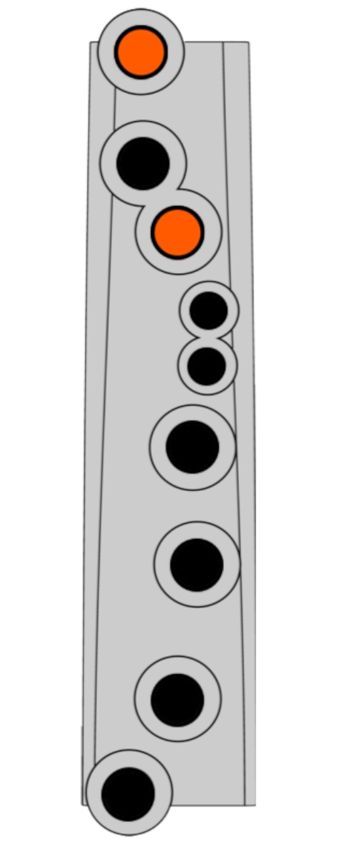
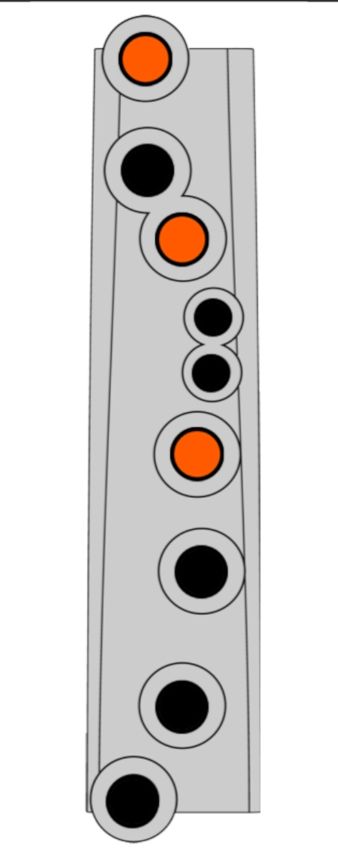
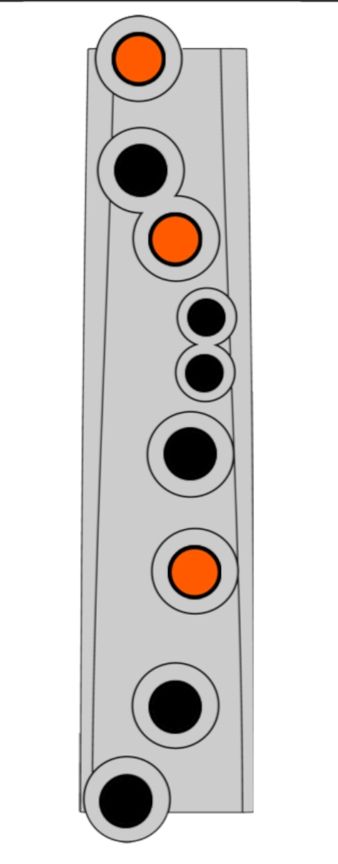
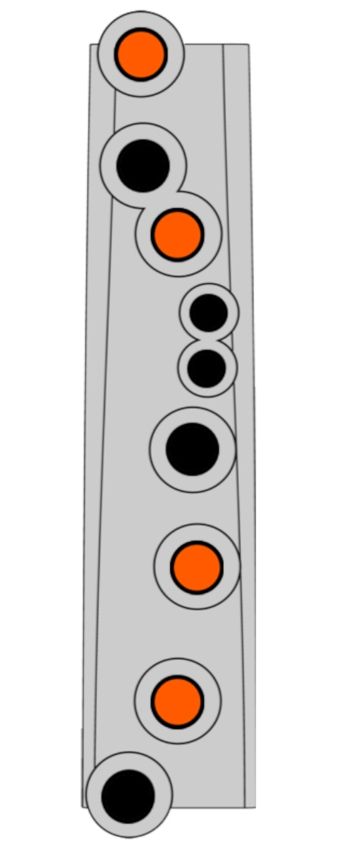
Again, all the previous alternate fingerings are available "out of the box" on the Aerophone Mini. But if we want to completely avoid the little keys, we still miss fingerings for C#/Db (in the lower position) and D#/Eb.
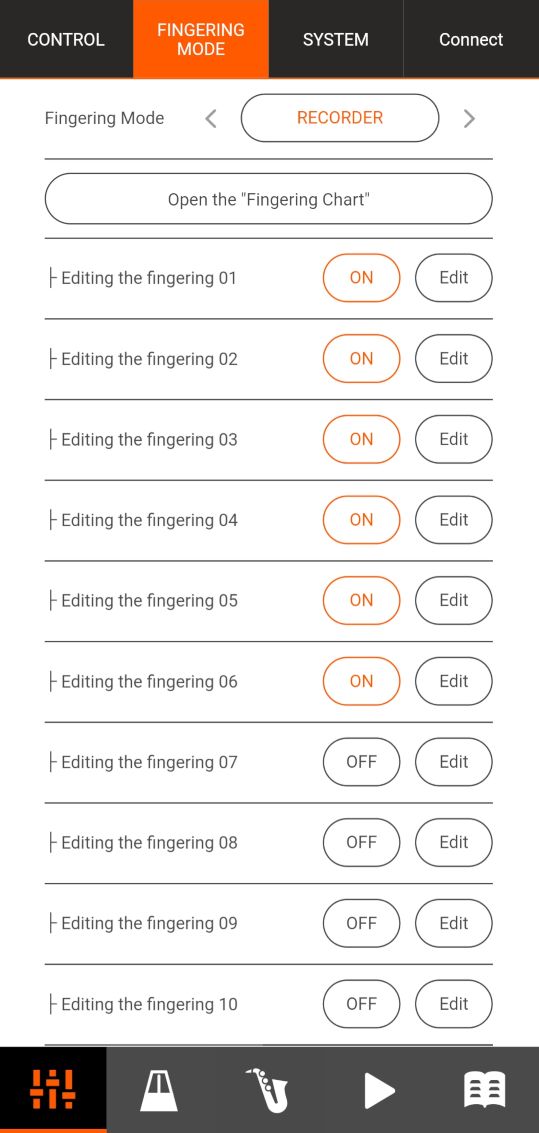
At this point, we need to add some "custom" fingering through the Aerophone Mini Plus app. Connect the Aerophone to the app via Bluetooth, go to Settings (bottom left icon), then FINGERING MODE and you will find up to 10 custom fingering that you can edit. Remember to activate them after editing (press the ON button).
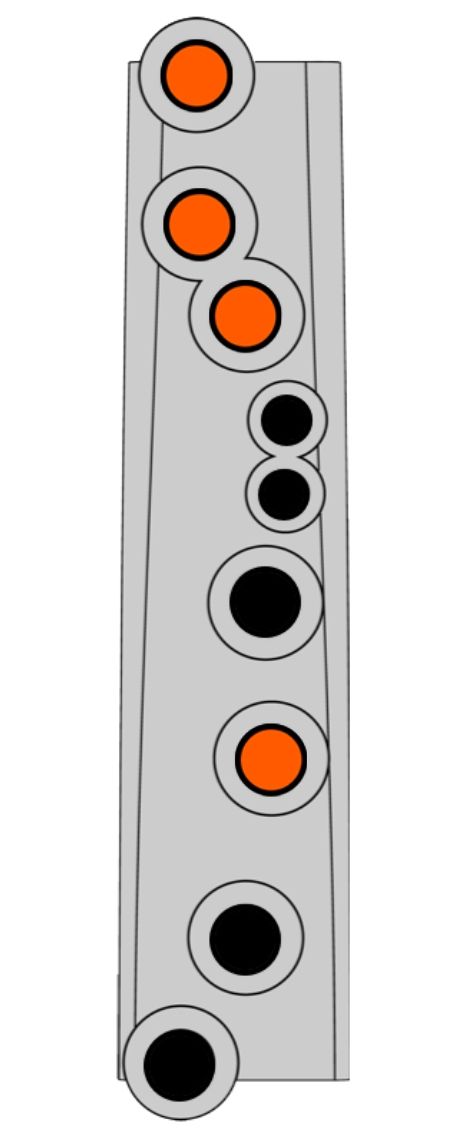
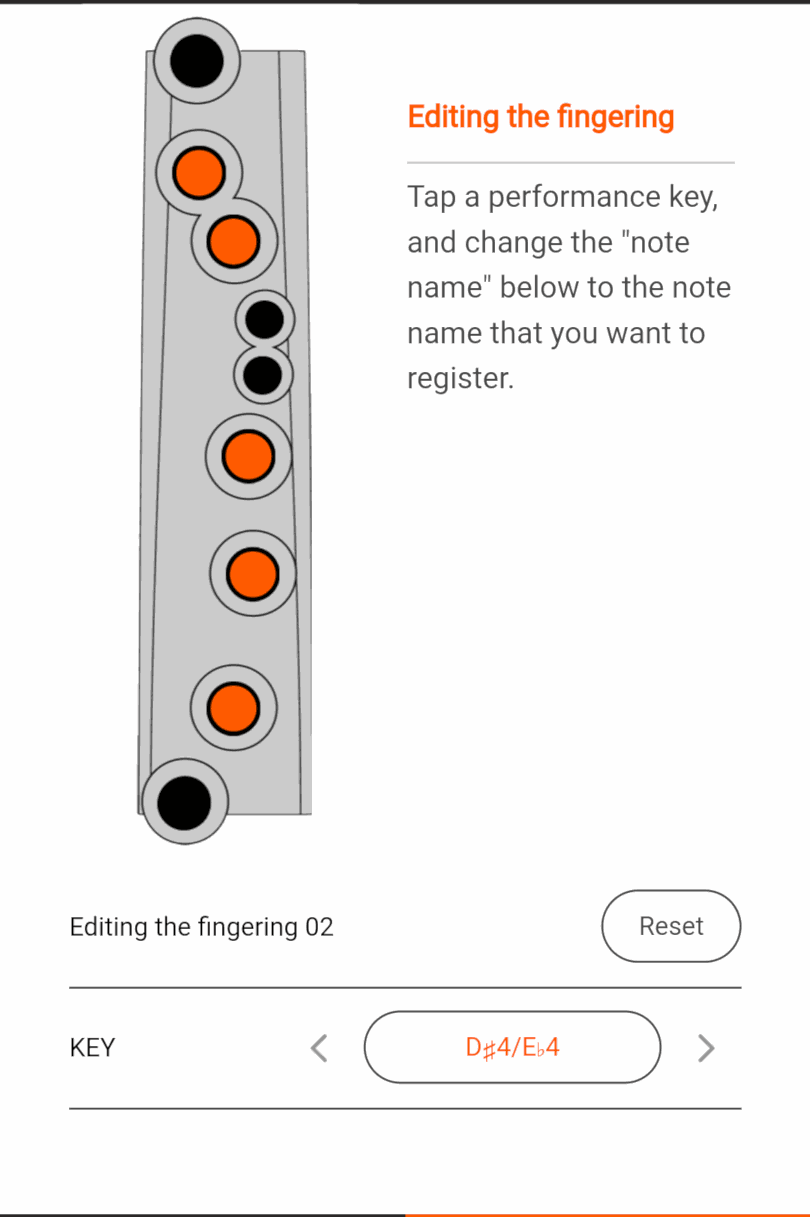 The first one we are going to add is a fingering for D#/Eb. There already is a fingering for this note on the C recorder (soprano and tenor, in the second octave) that we can use.
Select one of the fingering slots by pressing the corresponding Edit button, then select the keys as in the image aside. Remember to set the KEY to D#4/Eb4! Then press WRITE and then ON. That's it, you have a new fingering on your Aerophone!
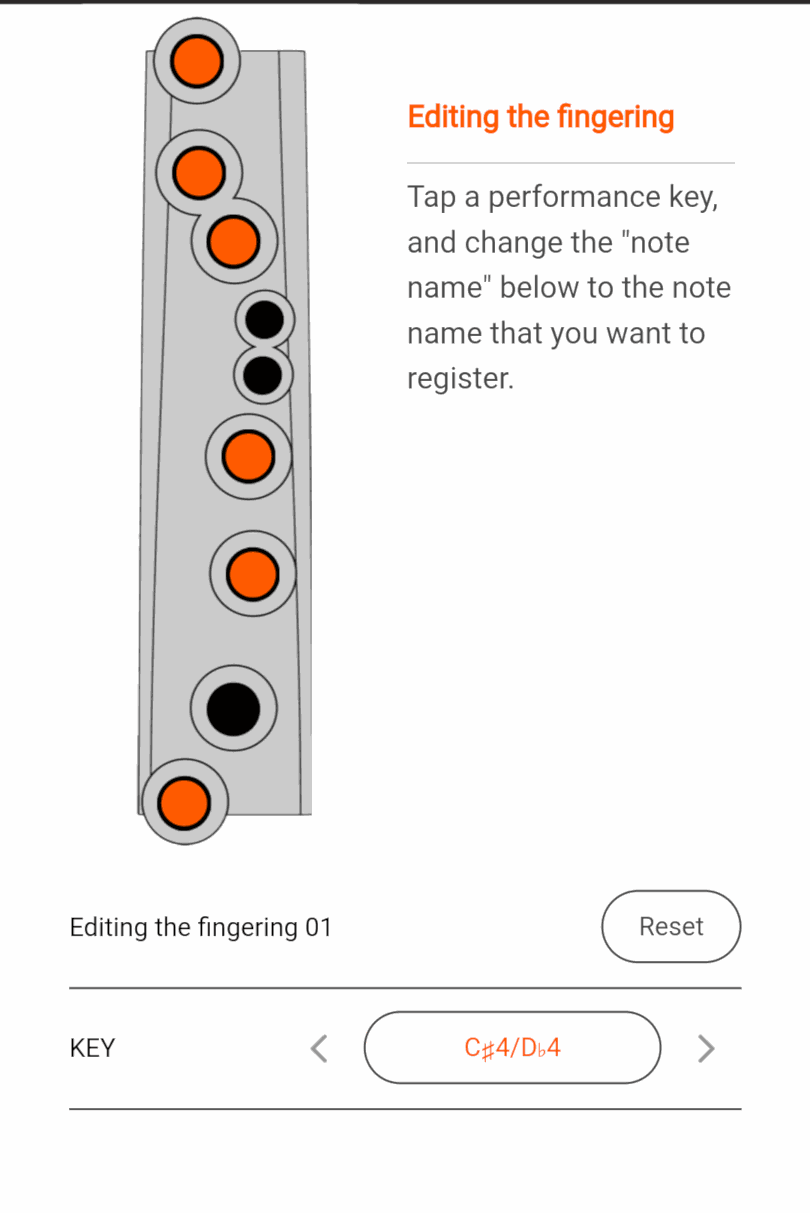
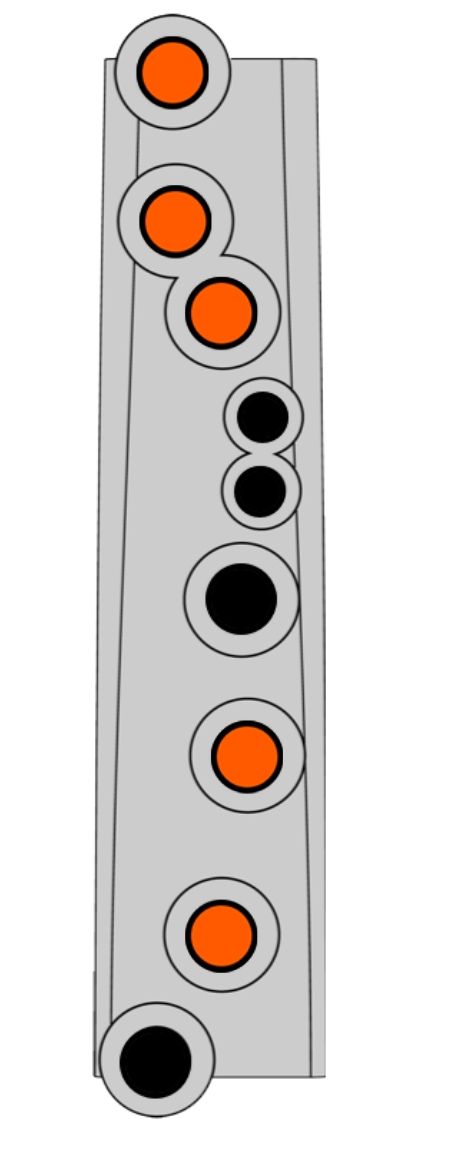
The second one is a fingering for C#/Db. Unfortunately, this time there is no fingering on the recorder that we can use, so we must invent a new one. This would take some time to get used to, but you know the reward: no more pinky finger!
Again, select one of the free fingering slots by pressing the corresponding Edit button, then select the keys as in the image aside. Remember to set the KEY to C#4/Db4! Then press WRITE and then ON.
That's it! We now have alternate fingerings for all the five chromatic notes, without resorting anymore to the small pinky keys.
Nonetheless, we could also add some more fingerings to help with octave changes and trills; once again, let us be inspired by the recorder! All the following fingerings share a common characteristics: they all allow for notes in the immediate higher octave without actually switching the octave with the octave keys (left thumb).
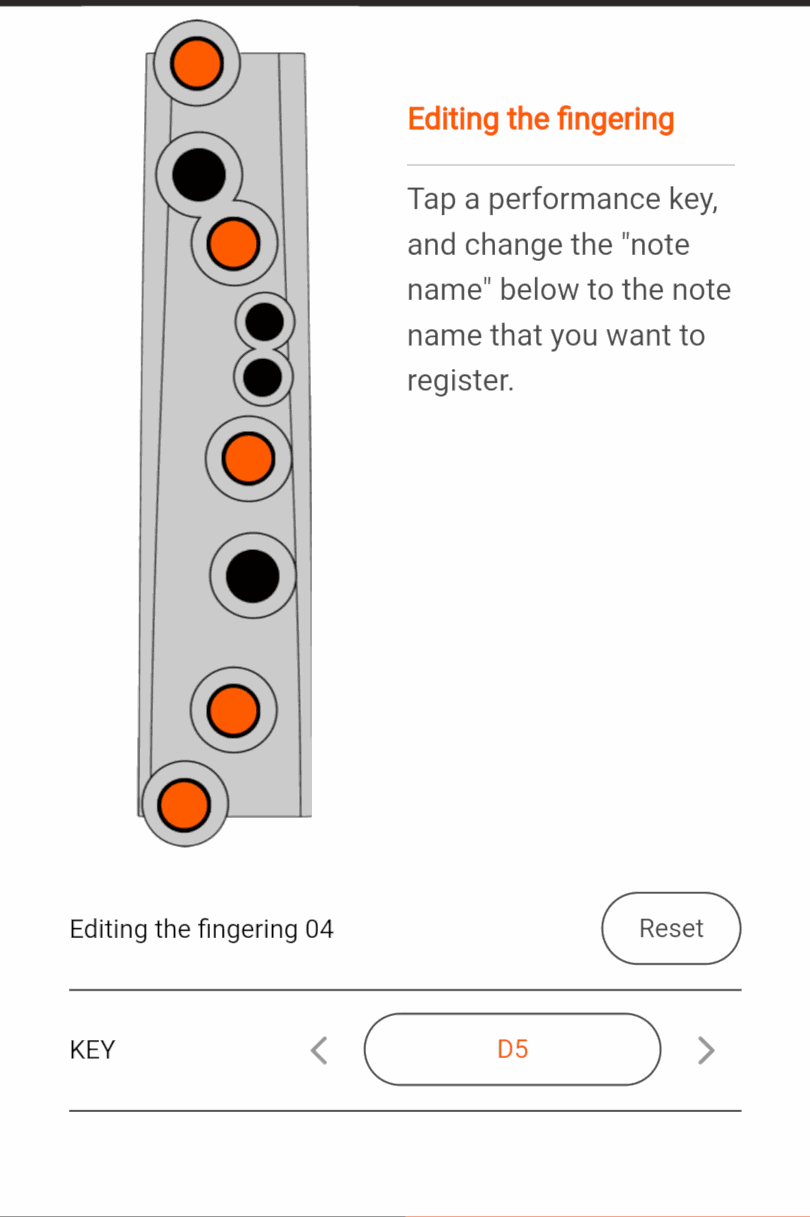
The first advanced alternate fingering we might want to add is one for D: it is taken from C recorders and corresponds to the fingering for D in the third register.
Select one of the free fingering slots by pressing the corresponding Edit button, then select the keys as in the image aside. Remember to set the KEY to C#5/Db5! Please note the "5" in the corresponding KEY (this number indicates the octave) and remember that in all the previous custom fingerings the selected note/key was a "4": by selecting "5" the note will be in the higher octave! Finally, press WRITE and then ON.
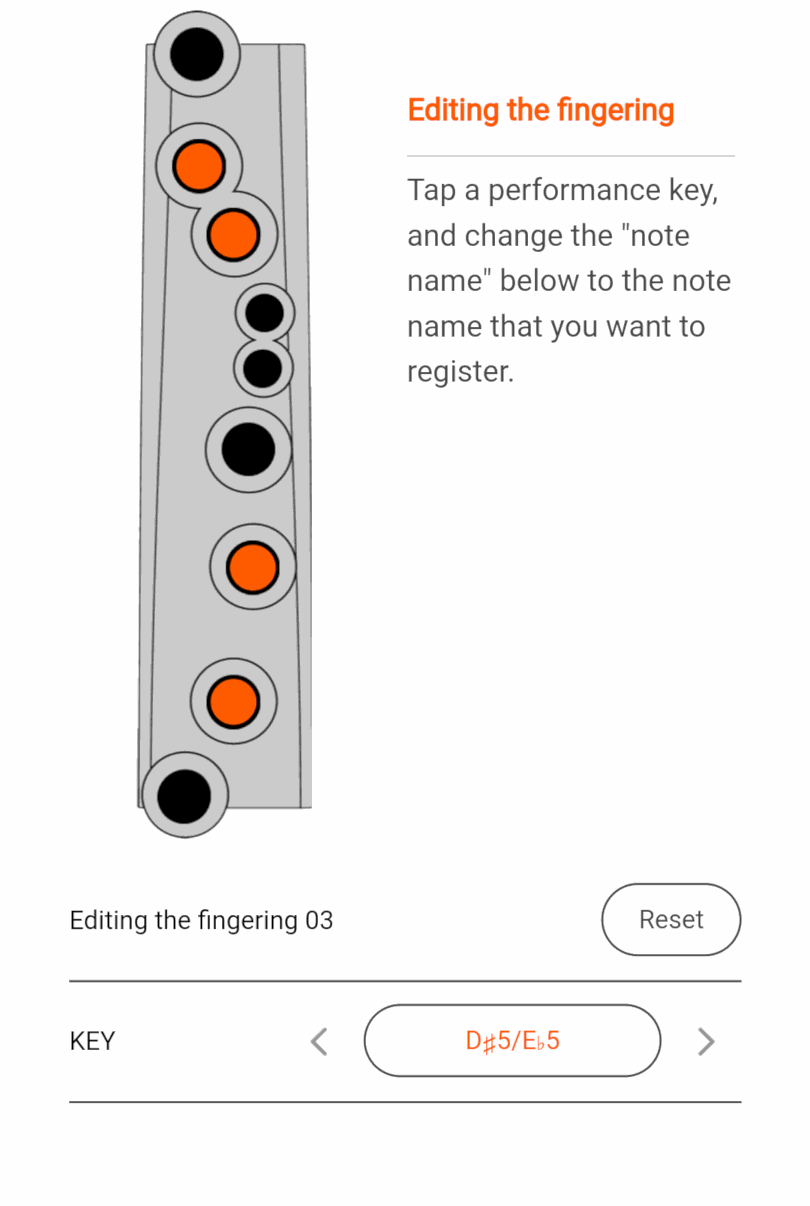 Then we are going to add one for D#/Eb, again in the immediate higher octave: it is taken from C recorders too and corresponds to the fingering for D#/Eb in the third register.
Select one of the free fingering slots by pressing the corresponding Edit button, then select the keys as in the image aside. Remember to set the KEY to D#5/Eb5! Again, please note the "5" in the corresponding KEY. Finally, press WRITE and then ON.
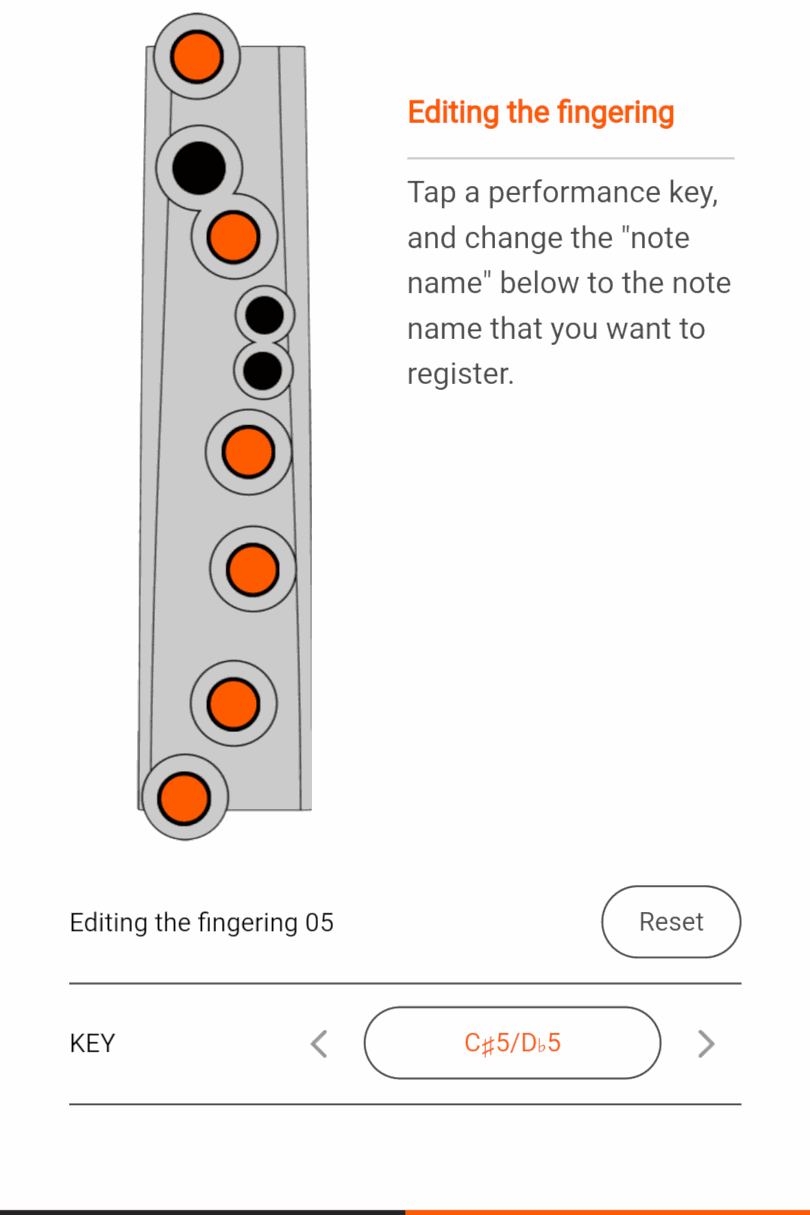
Finally, we are going to add one for C#/Db, again in the immediate higher octave: it is loosely taken from C recorders too and corresponds to the fingering for C#/Db in the third register (this fingering is slightly different on recorders and requires a special "filtering" technique). This fingering might be especially useful for trills.
Select one of the free fingering slots by pressing the corresponding Edit button, then select the keys as in the image aside. Remember to set the KEY to D#5/Eb5! Again, please note the "5" in the corresponding KEY. Finally, press WRITE and then ON.
That is all for now. If you want to share your alternate fingerings on the Roland Mini, please write to me!
(Gianluca Barbaro - first version: 2020/04/04)
EDIT 2020/07/09
By following the same technique and principles sketched above, I have come up with three new alternate fingerings.
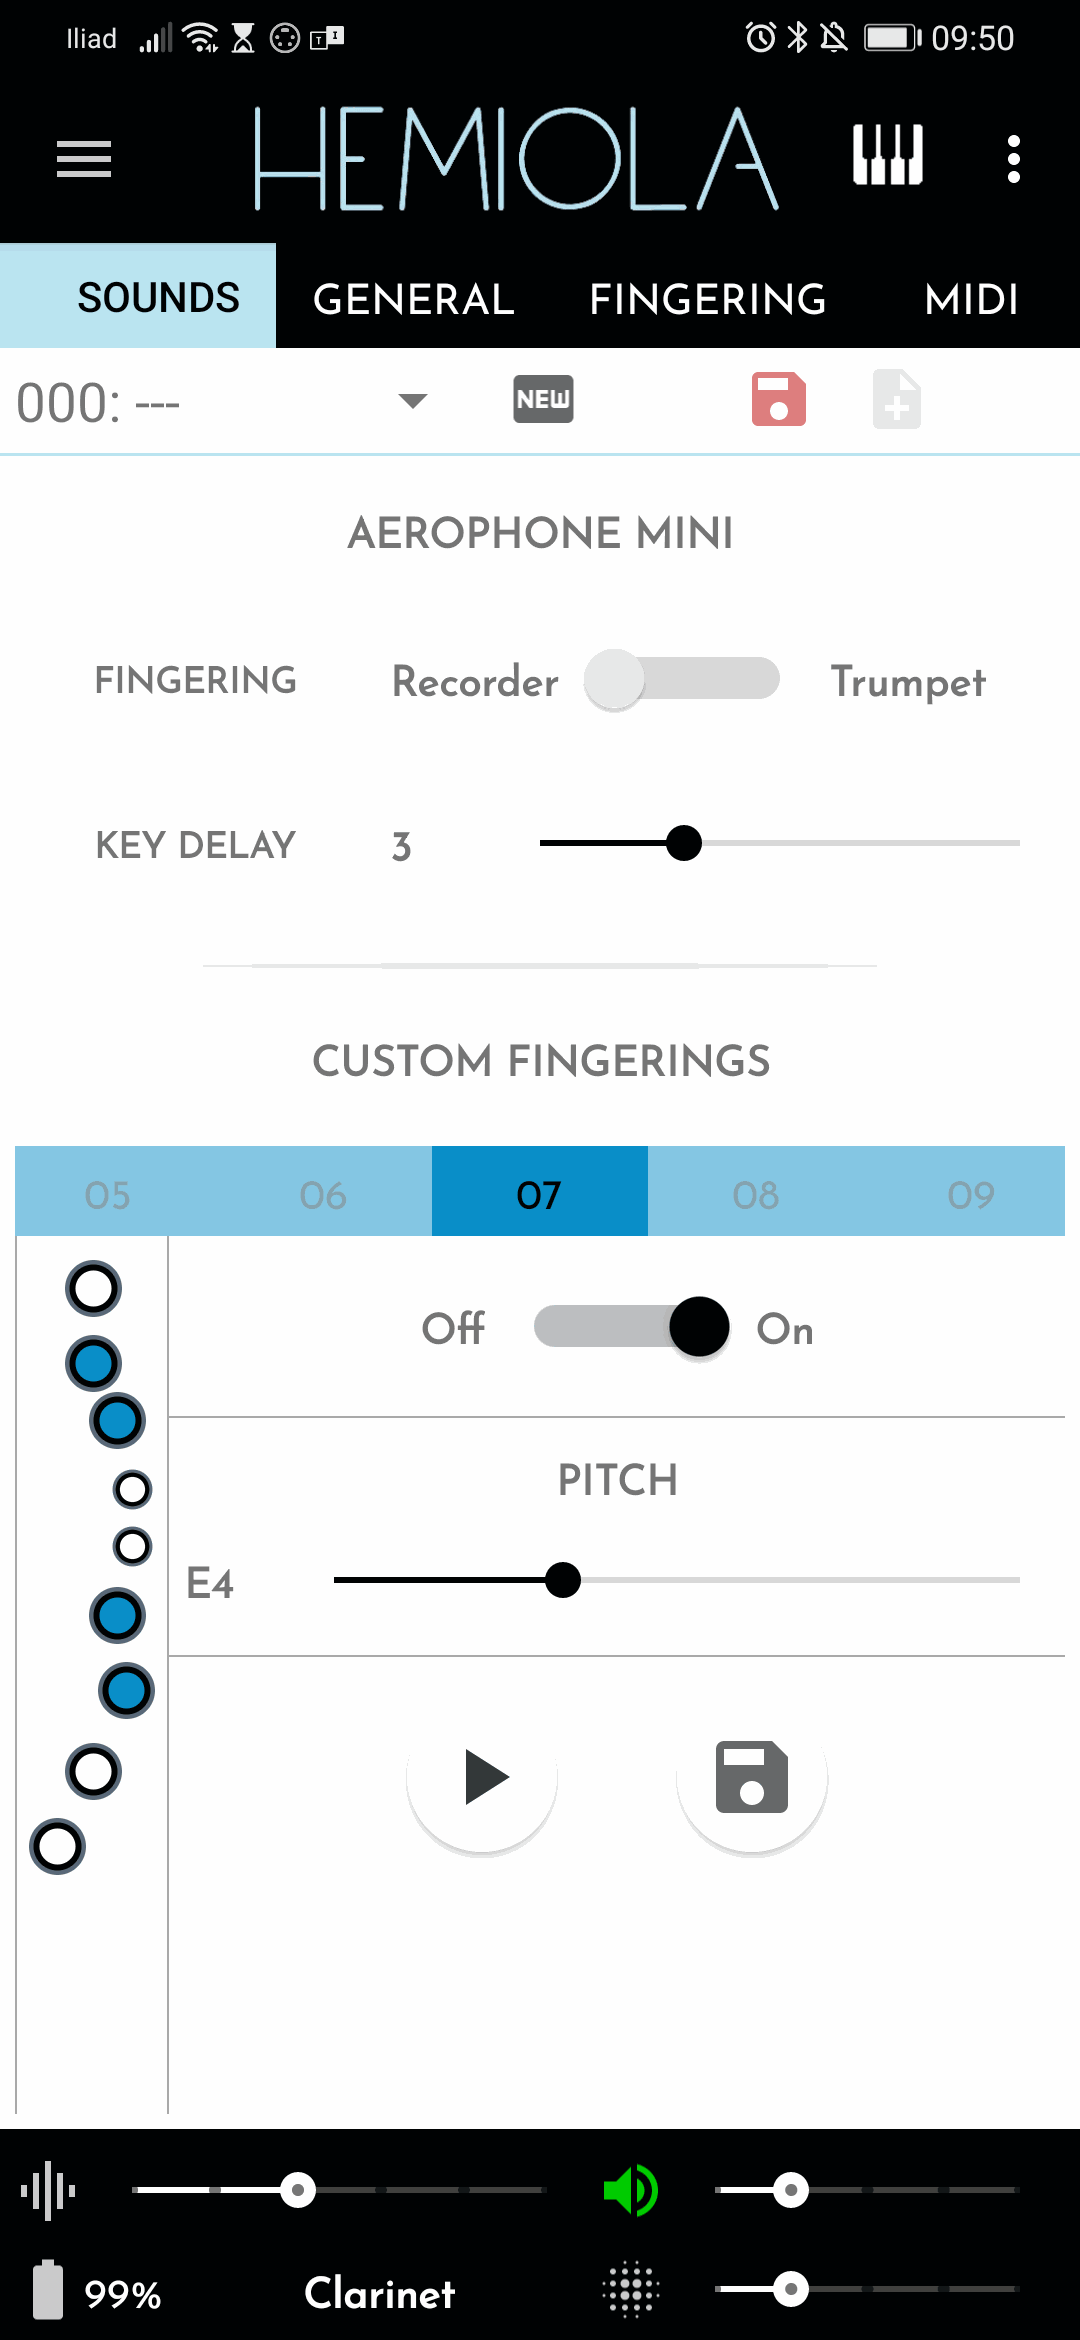
The second and third new alternate fingerings I advice you to program on your Aerophone Mini are an additional extension to range.
They are fingerings for the next-octave F and F#. The basic principle is the same applied in the previous one: we can take advantage of a lifted left index so the F would be the regular forked F minus the left index, and the F# is the same as the F plus the right medium finger. In the following pictures you can see how they look in Hemiola. Now we have a total extension of three octaves and a fifth, from B3 to F#7, which is pretty cool, isn't it?
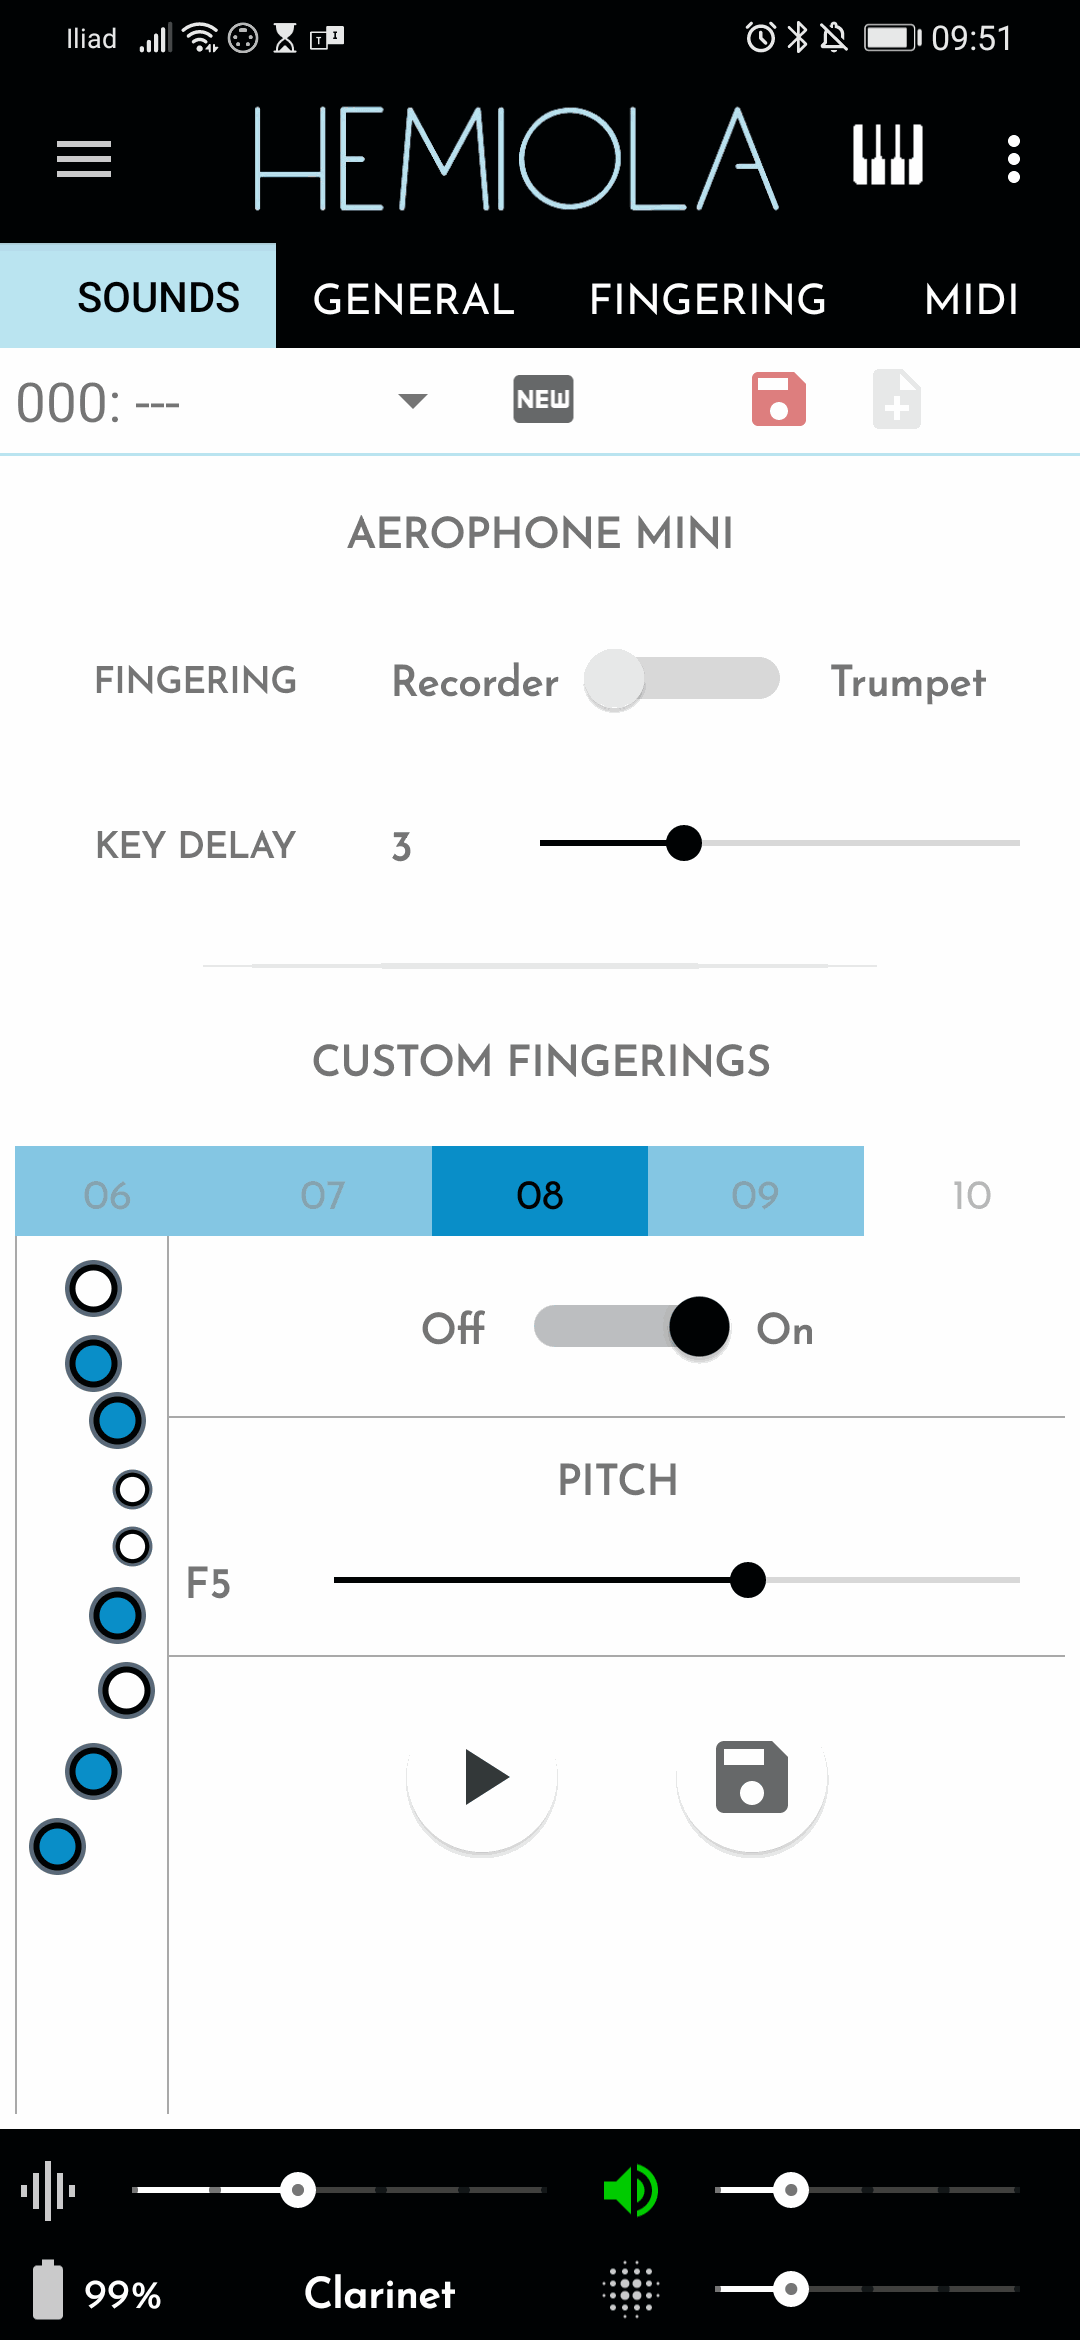

One final advice: practice the new fingerings by repeatedly playing scale fragments (from all the scales you know) that contain the new fingering(s) and then practice triads and 7th chords arpeggios for the whole (extended) range, using the alternate fingerings.
EDIT 2020/08/02: see my new article about Octave Exercises.